WebSurfer's Home

トップ > Blog 1   |   ログイン
APMLフィルター

DataGrid, GridView に動的に列を追加 (2)

by WebSurfer 2021年9月21日 14:56

昔「DataGrid, GridView に動的に列を追加」という記事を書きましたが、その記事よりスマートにできる方法を見つけたので以下に書いておきます。
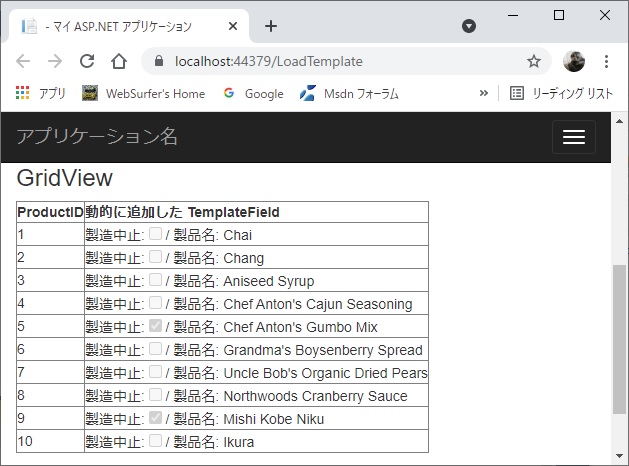
GridView での実行結果

先の記事ではどのようにしたかと言うと、DataGrid, GridView を構成している TableCellCollection の適切な位置に TableCell を追加するというプリミティブなやり方です。なので、列を追加するだけでもかなりコードを書かなければならないし、コントロールにデーターバインドしようとするとさらに面倒なことになります。

ところが最近になって Microsoft の Visual Studio 2008 用の MSDN ライブラリに「方法 : DataList Web サーバー コントロールのテンプレートを動的に作成する 」という記事があるのを見つけ、その方法が DataGrid, GridView にも使えることを知りました。

その MSDN ライブラリはもうネットには見つかりませんので、スクリーンショットを撮ってこの記事の下の方に貼っておきます。興味がありましたら見てください。

先の記事に書いたような TableCell を追加してなんちゃらという面倒なことをする必要はなく、TemplateColumn (DataGrid の場合) または TemplateField (GridView の場合) を生成し、それを DataGrid.Columns.Add メソッドまたは GridView.Columns.Add で追加するということで列の追加が可能です。

TemplateColumn, TemplateField の中身はユーザーコントロール (.ascx) から作成します。作成したユーザーコントロールから TemplateControl.LoadTemplate メソッドで ITemplate インターフェイスのインスタンスを生成し、当該テンプレート (ItemTemplate, AlternatingItemTemplate 等) に代入してやります。

ユーザーコントロール内に配置したコントロールには <%# Eval("Name") %> というようなデータバインド式を含めることができます。そうしておけば、静的にデータバインド式を使った場合と同様に、自動的にデータソースからデータを取得して表示されます。

具体例は以下の通りです。上の画像を表示したコードで、データソースに SQL Server のサンプルデータベース Northwind の Products テーブルを使って、その PtoductName 列と Discontinued 列を動的に追加した TemplateColumn, TemplateField に表示しています。

(1) ユーザーコントロールの作成

テンプレートの中身のコントロールを配置したユーザーコントロール (.ascx) を作成します。以下の例では CheckBox と Label をテンプレートの中身として配置しています。データバインド式を含めているところにも注目してください。

<%@ Control Language="C#" AutoEventWireup="true" 
    CodeBehind="NewTemplate.ascx.cs" 
    Inherits="WebApplication2.NewTemplate" %>

製造中止: 
<asp:CheckBox ID="CheckBox1" runat="server" 
    Checked='<%# Eval("Discontinued") %>' 
    Enabled="false" />
/ 
製品名: 
<asp:Label ID="Label1" runat="server" 
    Text='<%# Eval("ProductName") %>'>
</asp:Label>

ユーザーコントロールの名前は、ここでは NewTemplate.ascx としました。名前は任意に設定して構いませんが .aspx.cs の LoadTemplate メソッドの引数にその名前を使いますので注意してください。

(2) TemplateColumn, TemplateField の追加

.aspx.cs

DataGrid は TemplateColumn を、GridView は TemplateField を使うという違いがあり、それによる若干の違いがありますので注意してください。

using System;
using System.Web.UI;
using System.Web.UI.WebControls;

namespace WebApplication2
{
    public partial class LoadTemplate : System.Web.UI.Page
    {
        protected void Page_Init(object sender, EventArgs e)
        {
            // DataGrid に TemplateColumn を追加
            var templateColumn = new TemplateColumn();
            templateColumn.HeaderText = "動的に追加した TemplateColumn";
            templateColumn.ItemTemplate = LoadTemplate("NewTemplate.ascx");
            DataGrid1.Columns.Add(templateColumn);

            // GridView に TemplateField を追加
            var templateField = new TemplateField();
            templateField.HeaderText = "動的に追加した TemplateField";
            templateField.ItemTemplate = LoadTemplate("NewTemplate.ascx");
            GridView1.Columns.Add(templateField);
        }
    }
}

.aspx

マスターページを使っています。ほぼ 100% デザイナで自動生成したコードで、DB の ProductID のみを表示するように作成しました。ProductName と Discontinued は上の .aspx.cs で動的に追加した列に表示します。

<%@ Page Title="" Language="C#" MasterPageFile="~/Site.Master" 
    AutoEventWireup="true" CodeBehind="LoadTemplate.aspx.cs" 
    Inherits="WebApplication2.LoadTemplate" %>

<asp:Content ID="Content1" ContentPlaceHolderID="MainContent" runat="server">
    
    <asp:SqlDataSource ID="SqlDataSource1" 
        runat="server" 
        ConnectionString="<%$ ConnectionStrings:NORTHWINDConnectionString %>" 
        SelectCommand="SELECT TOP 10 [ProductID], [ProductName], [Discontinued] 
                       FROM [Products]">
    </asp:SqlDataSource>

    <h3>DataGrid</h3>
    <asp:DataGrid ID="DataGrid1"
        runat="server" 
        AutoGenerateColumns="False" 
        DataSourceID="SqlDataSource1">
        <Columns>
            <asp:BoundColumn DataField="ProductID" 
                HeaderText="ProductID" />
        </Columns>
    </asp:DataGrid>

    <h3>GridView</h3>
    <asp:GridView ID="GridView1" 
        runat="server" AutoGenerateColumns="False" 
        DataKeyNames="ProductID" 
        DataSourceID="SqlDataSource1">
        <Columns>
            <asp:BoundField DataField="ProductID" 
                HeaderText="ProductID" 
                InsertVisible="False" ReadOnly="True" 
                SortExpression="ProductID" />
        </Columns>
    </asp:GridView>
</asp:Content>

最後に、上にも書きましたが、参考にした Visual Stidio 2008 の MSDN ライブラリのスクリーンショットを下に貼っておきます。
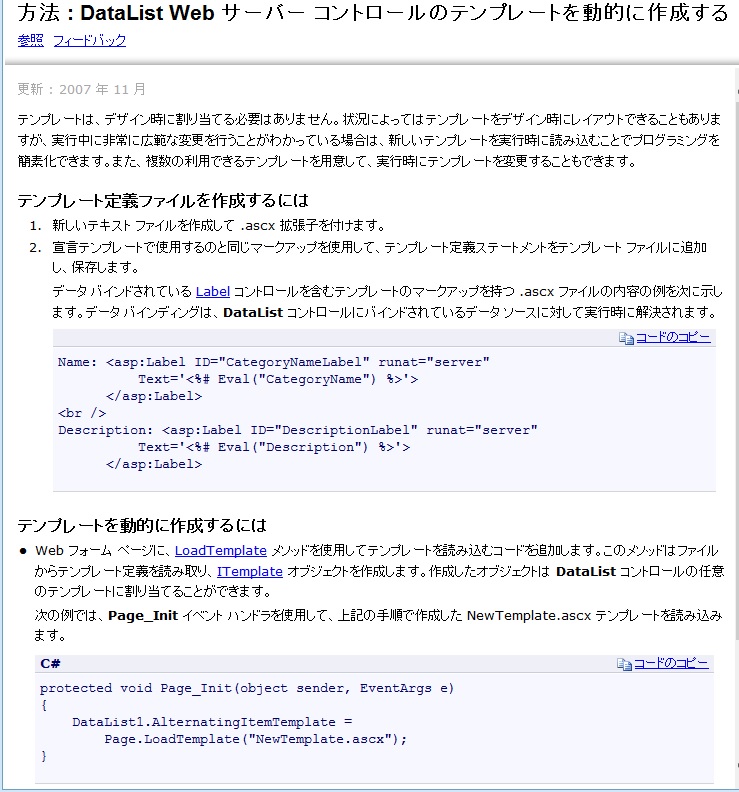
MSDN ライブラリ

Tags: , , ,

ASP.NET

DataGrid, GridView に動的に列を追加

by WebSurfer 2013年5月17日 16:41

あまり使い道はないと思いますが、DataGrid と GridView に動的に列を追加する方法を備忘録として書いておきます。 (【2021/9/21 追記】もっと簡単かつスマートにできる方法がありました。詳しくは「DataGrid, GridView に動的に列を追加 (2)」を見てく���さい)

DataGrid に動的に列を追加

DataGrid, GridView ともヘッダ、フッタを含め各行は TableCellCollection で構成されているので、そのコレクションの適切な位置に TableCell を追加することが基本です。

追加したセルの中に文字列や CheckBox などを配置したい場合は、当該セルの ControlCollection に LiteralControl や CheckBox を初期化して追加します。

追加するタイミングは、DataGrid なら ItemCreated イベント、GridView なら RowCreated イベントがよさそうです。

その例を以下のコードに示します。上の画像を表示したものです。実際に動かして試すことができるよう 実験室 にアップしました。興味のある方は試してみてください。

<%@ Page Language="C#" %>
<%@ Import Namespace="System.Data" %>

<!DOCTYPE html PUBLIC "-//W3C//DTD XHTML 1.0 Transitional//EN"
 "http://www.w3.org/TR/xhtml1/DTD/xhtml1-transitional.dtd">

<script runat="server">

  // 表示用のデータソース (DataView) を生成
  ICollection CreateDataSource()
  {
    DataTable dt = new DataTable();
    DataRow dr;
       
    dt.Columns.Add(new DataColumn("Item", typeof(Int32)));
    dt.Columns.Add(new DataColumn("Name", typeof(string)));
    dt.Columns.Add(new DataColumn("Price", typeof(decimal)));

    for (int i = 0; i < 5; i++)
    {
      dr = dt.NewRow();

      dr["Item"] = i;
      dr["Name"] = "Name-" + i.ToString();
      dr["Price"] = 1.23m * (i + 1);

      dt.Rows.Add(dr);
    }

    DataView dv = new DataView(dt);
    return dv;
  }

  // 初回のみデータソースを生成してバインド(ポストバック
  // 時は ViewState から自動的にデータを取得するので不要)
  protected void Page_Load(object sender, EventArgs e)
  {
    if (!IsPostBack)
    {
      ICollection dv = CreateDataSource();
      DataGrid1.DataSource = dv;
      DataGrid1.DataBind();
      GridView1.DataSource = dv;
      GridView1.DataBind();
    }
  }
    
  // GataGrid.ItemCreated イベントで列を動的に追加する。
  // ItemDataBound イベントで行うと以下の問題があるので
  // 注意:
  // (1) ポストバック時にはイベントが発生しないので追加
  //     行を再生できず、結果消えてしまう。
  // (2) 追加コントロールの LoadViewState, LoadPostData 
  //     の呼び出しがうまくいかない。結果、以下の例では 
  //     CheckBox の CheckedChanged イベントの発生が期
  //     待通りにならない。
  protected void DataGrid1_ItemCreated(object sender, 
    DataGridItemEventArgs e)
  {
    if (e.Item.ItemType == ListItemType.Header)
    {
      // ヘッダ行に列(セル)を追加。セルの中にリテ
      // ラルを配置。
      TableCell cell = new TableCell();
      cell.Controls.Add(new LiteralControl("追加列"));
      e.Item.Cells.Add(cell);
    }
    else if (e.Item.ItemType == ListItemType.Item ||
      e.Item.ItemType == ListItemType.AlternatingItem)
    {
      // データ行に列(セル)を追加。セルの中に
      // CheckBox を配置。
      TableCell cell = new TableCell();
      CheckBox cb1 = new CheckBox();
      cb1.AutoPostBack = true;
      cb1.ID = "CheckBoxInItemIndex-" + 
        e.Item.ItemIndex.ToString();
      cb1.CheckedChanged += 
        new EventHandler(cb1_CheckedChanged);
      cell.Controls.Add(cb1);
      e.Item.Cells.Add(cell);
    }
    else if (e.Item.ItemType == ListItemType.Footer)
    {
      // フッタ行に列(セル)を追加。セルの中にリテ
      // ラルを配置。
      TableCell cell = new TableCell();
      cell.Controls.Add(new LiteralControl("追加列"));
      e.Item.Cells.Add(cell);
    }
  }

  protected void cb1_CheckedChanged(object sender, 
    EventArgs e)
  {
    CheckBox cb = (CheckBox)sender;
    Label1.Text = cb.ID + " clicked to " + 
      cb.Checked.ToString();
  }

  // DataGrid の場合と同様な理由で RowDataBound イベ
  // ントではなく RowCreated イベントで動的に列を追
  // 加する。
  protected void GridView1_RowCreated(object sender, 
    GridViewRowEventArgs e)
  {
    if (e.Row.RowType == DataControlRowType.Header)
    {
      // ヘッダ行に列(セル)を追加。セルの中にリテ
      // ラルを配置。
      // GridView のヘッダ行は th 要素が使われるので、
      // TableCell でなく TableHeaderCell を用いる。
      TableHeaderCell hc = new TableHeaderCell();
      hc.Controls.Add(new LiteralControl("追加列"));
      e.Row.Cells.Add(hc);
    }
    else if (e.Row.RowType == DataControlRowType.DataRow)
    {
      // データ行に列(セル)を追加。セルの中に
      // CheckBox を配置。
      TableCell cell = new TableCell();
      CheckBox cb2 = new CheckBox();
      cb2.AutoPostBack = true;
      cb2.ID = "CheckBoxInRowIndex-" + 
        e.Row.RowIndex.ToString();
      cb2.CheckedChanged += 
        new EventHandler(cb2_CheckedChanged);
      cell.Controls.Add(cb2);
      e.Row.Cells.Add(cell);
    }
    else if (e.Row.RowType == DataControlRowType.Footer)
    {
      // フッタ行に列(セル)を追加。セルの中にリテ
      // ラルを配置。
      TableCell cell = new TableCell();
      cell.Controls.Add(new LiteralControl("追加列"));
      e.Row.Cells.Add(cell);
    }
  }

  protected void cb2_CheckedChanged(object sender, 
    EventArgs e)
  {
    CheckBox cb = (CheckBox)sender;
    Label2.Text = cb.ID + " clicked to " + 
      cb.Checked.ToString();
  }

</script>

<html xmlns="http://www.w3.org/1999/xhtml">
<head runat="server">
  <title>WebSurfer's Page - 実験室</title>
</head>
<body>
  <form id="form1" runat="server">

    <h2>DataGrid</h2>
    <asp:DataGrid ID="DataGrid1"
      runat="server" 
      ShowFooter="True" 
      OnItemCreated="DataGrid1_ItemCreated">
    </asp:DataGrid>
    <asp:Label ID="Label1" runat="server" />

    <h2>GridView</h2>
    <asp:GridView ID="GridView1" 
      runat="server" 
      ShowFooter="True" 
      OnRowCreated="GridView1_RowCreated">
    </asp:GridView>
    <asp:Label ID="Label2" runat="server" />

  </form>
</body>
</html>

Tags: ,

ASP.NET

About this blog

2010年5月にこのブログを立ち上げました。主に ASP.NET Web アプリ関係の記事です。

Calendar

<<  2024年5月  >>
2829301234
567891011
12131415161718
19202122232425
2627282930311
2345678

View posts in large calendar